Open topic with navigation
You are here: Kiosk > Configuring Kiosk v2
Configuring Kiosk v2
The Idealpos Kiosk is handled the same as a networked Idealpos POS Terminal and can be configured in the same manner.
E.g. Configure each Kiosk terminal with a static IP address, then enter each Kiosk's IP address into their relevant entry in Back Office > Setup > Networking.
Kiosk receipt printers are also configured in the same way as a standard Idealpos POS Terminal via Back Office > Setup > Network Printers.
Items ordered from the Kiosk will print to their respective Kitchen Printers.
Configuring Kiosk v2 Quick Links
Refer to the below links for information about setting up Kiosk v2.
The links below are broken down into three separate headings (Core Kiosk Setup, Extra Functionality and Functionality configured via Back Office > Setup > POS Terminals > Modify > Display/Kiosk).
Core Kiosk Setup
The below links relate to the core Kiosk setup required to get Kiosk enabled and the customisation of the Kiosk Grids, Modifier Grids and Kiosk button images.
- Enabling Kiosk v2 - The initial steps to License the Kiosk module, select the Kiosk Style and set the Windows Screen Resolution of the Kiosk Terminal.
- Customising Kiosk POS Screen Grid - Steps to customise the Kiosk POS Screen Grid Layout.
- Customising Kiosk Modifier Grids - Steps to customise the Kiosk Modifier Grids that are displayed when adding a Stock Item to a sale on the Kiosk (e.g. for a Hamburger, options such as Bun Type, Sauce Type,
Inclusions such as extra Ham, Exclusions such as No Sauce, etc).
- Customising Kiosk Item Images - Steps to customise the Stock Item images that appear within the Stock Item buttons on the Kiosk screen (e.g. images for Hamburgers, Drinks, whichever items are displayed on the Kiosk for the consumer to press).
Extra Functionality
The below links relate to the setup of extra functionality on the Kiosk Terminal.
- Estimated Wait Time Function - The Estimated Wait Time function which will display an Estimated Wait Time at the top of the Kiosk screen.
- Item Availability - The Item Availability function can be used to prevent an item from being added to a sale when it is no longer available.
- Open/Close Function - The Open/Close function can be used to Close and Open a Kiosk Terminal. This function is accessed from a standard Idealpos POS Terminal. When the Kiosk is closed, it will display the Kiosk Closed image.
- KIOSKCHECKOUTBUTTON User-Defined Option - The KIOSKCHECKOUTBUTTON User-Defined Option can be used to change the default "CHECK OUT" text that appears within the button at the bottom of the Kiosk screen.
Functionality configured via Back Office > Setup > POS Terminals > Modify > Display/Kiosk
The below links relate to the options that are displayed in Back Office > Setup > POS Terminals > Modify > Display/Kiosk.
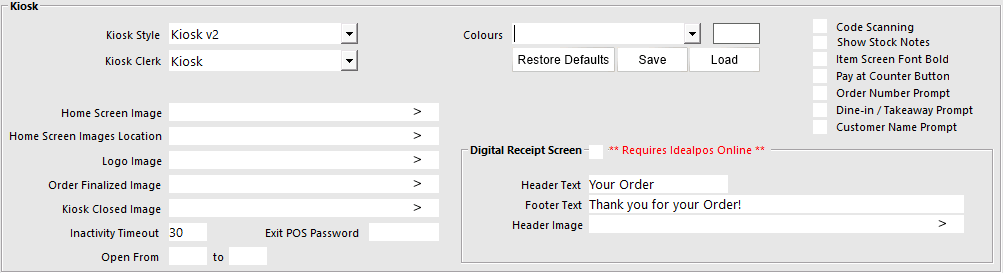
- Colours - The colours that are used to display each element on the Kiosk screen can be customised.
- Checkout Upsell Grid - A Checkout Upsell Grid can be enabled which will appear on the Kiosk after the customer presses the CHECK OUT button.
- Home Screen Images and Location - A Home Screen Image can be configured via the Home Screen Images field; the image is displayed when the Kiosk is idle.
- Logo Image - A Logo Image can be configured that will appear on the top-left corner of the Kiosk screen.
- Order Finalised Image - An Order Finalised Image can be configured to will appear after the customer finishes placing their order.
- Kiosk Closed Image - A Kiosk Closed Image can be configured to appear when the Kiosk is closed.
- Inactivity Timeout - An Inactivity Timeout period can be set that will trigger the Kiosk to cancel any sale that has been abandoned by a customer and return to the start, ready for the next customer.
- Open From/To - Open From/To hours can be configured. The Kiosk will automatically open and close as per the hours that are set.
- Exit POS Password - An Exit POS Password can be configured for the Kiosk. This is strongly recommended to prevent customers from closing the Kiosk POS Screen.
- Digital Receipt Screen - This function requires Idealpos Online. Digital Receipt functionality can be enabled on the Kiosk; at the end of the sale, the Kiosk will display a screen that shows a QR Code that the customer can scan with their phone to retrieve a copy of a digital receipt of the sale.
Kiosk Yes/No Options
The following Yes/No Options (configured via Back Office > Setup > Yes/No Options > Kiosk) can be toggled to customise the behaviour of the Kiosk:
- Customer Code Scanning - The Kiosk can have Customer Code Scanning enabled which can be used by customers to scan their loyalty card. When their loyalty card has been scanned into the sale, they can choose to redeem their accrued points to pay for the sale.
- Extra-Large Buttons - The Extra-Large Buttons button can be enabled to display all Stock Item buttons on the Kiosk Screen as Extra-Large. Toggling this option on/off will require a Close Suite/Open Suite on the Kiosk Terminal.
- Show Coupon Button - The Coupon Button can be enabled which will trigger a Coupon button to appear at the bottom of the CHECK OUT screen. Pressing this button will trigger an on-screen keyboard to appear on the Kiosk which can be used by the customer to enter a Coupon Code. The Coupon will then trigger any applicable Discounts or Promotions to be applied to the sale.
- Show Customer Name Prompt - A Customer Name Prompt can be enabled which will be displayed before the customer pays for their order. The customer's name will be printed on the Kitchen Docket to make it easy to identify which customer the order is being prepared for.
- Show Dine-In/Takeaway Prompt - A Dine-In/Takeaway prompt can be enabled that will be displayed when a customer uses the Kiosk. This functionality uses the Sale Type feature in Idealpos. Enabling this option will trigger Idealpos to automatically create a Dine-In and Takeaway Sale Type if they don't already exist (in Setup > Global Options > Sales > Sale Type Status).
- Show Item Detail screen with Bold Font - The Item Screen Font Bold option can be enabled which will trigger the Stock Item Descriptions shown on the Kiosk to appear in bold type.
- Show Order Number Prompt - An Order Number prompt can be enabled that will be displayed when the customer places their order at the Kiosk. The Order Number can be something such as the customer's phone number and can be used to identify which customer an order belongs to.
- Show 'Pay at Counter' Button - A Pay at Counter button can be enabled and used by the customer if they want to pay for their order at a standard POS Terminal/Counter. This can be used if the customer wants to pay with cash or a different tender that isn't available on the Kiosk terminal.
- Show Stock Notes on Item Detail Screen - Stock Notes can be displayed on the Kiosk screen so that the customer can see additional information about the item they are adding to the sale on the Kiosk.
-
-
-
-
-
Open topic with navigation